

Table of Contents
- Why Quality Stitching Matters for Garment Longevity
- Signs of High Quality Clothing: What to Examine First
- Stitches Per Inch and Stitch Density: Understanding the Foundation
- Examining Seam Quality and Seam Allowance
- How to Identify Durable Seams and Reinforcement
- Machine Versus Hand-Stitching: How to Tell the Difference
- Checking Hems, Edge Finishing, and Fabric Hand-Feel
- Post-Wash Stitching Integrity: Testing Durability
Last Updated: August 10, 2026
Why Quality Stitching Matters for Garment Longevity
A garment's lifespan depends far more on its construction than on its fabric alone. Quality stitching determines whether a dress lasts one season or five, whether seams hold under stress or split after a few wears. Quality craftsmanship begins with the thread and the tension that holds it.
Most shoppers focus on material and overlook the invisible architecture that keeps everything together. Yet a premium fabric sewn with careless stitching will fail faster than a modest fabric constructed with precision. Quality stitching affects durability, comfort, and the garment's ability to maintain its shape, loose stitches pucker, weak seams split at stress points, and inconsistent tension creates visible defects that worsen with every wash.
Signs of High Quality Clothing: What to Examine First
The first signs of high quality clothing reveal themselves under close inspection. Before you look at price tags or brand names, examine the garment in natural light. Quality speaks through consistency, precision, and attention to detail in every visible seam.
Visual inspection under natural light
Hold the garment up to a window and look for these markers of quality construction. Stitching should be perfectly straight with no wobbles. Thread colour should match the fabric seamlessly; mismatched thread signals cost-cutting or careless production.
Run your fingers along the seams. Quality stitching feels smooth; poor stitching creates little bumps where tension was inconsistent. Look at the inside of the garment. Seam allowances should be finished, folded, serged, or bound, rather than left as raw, fraying edges. Check for puckering, which appears as small gathered areas along seams and indicates improper thread tension or fabric-thread mismatch.
Checking for consistent thread colour matching
Thread matching is deceptively difficult and surprisingly revealing. Manufacturers who cut corners use thread that's close enough but not exact. Examine topstitching around hems, collars, and cuffs. If the thread matches the fabric perfectly, the maker invested in proper thread sourcing. On light fabrics, mismatched thread is immediately obvious and signals rushed assembly.
Stitches Per Inch and Stitch Density: Understanding the Foundation
Stitches per inch (SPI) and stitch density are the technical language of durability. These measurements determine whether a seam will hold under stress or fail after a few wears.
How to measure stitches per inch
To measure stitches per inch, use a ruler and count the individual stitches within one inch of seam. Most quality garments have between 12 and 16 stitches per inch on standard seams. Finer fabrics and stress points often have 18 to 20 or more, because stitches need to be closer together to distribute load evenly. Loose, widely-spaced stitches (fewer than 10 SPI) indicate casual garments or poor construction.
The easiest way to assess SPI without measuring tools is visual comparison. If individual stitches are clearly visible and spaced far apart, that's low SPI. If stitches blend into a nearly solid line, that's high SPI. Quality garments typically fall into the medium-to-high range.
What is stitch density in clothing and why it matters
Stitch density in clothing refers to how closely stitches are packed together along a seam. Higher stitch density creates stronger, more durable seams because the load is distributed across more anchor points rather than concentrated on fewer ones. Think of it like a bridge: supports every foot are stronger than supports every ten feet. More stitches per inch mean more points where thread is anchored to fabric, making the seam less likely to fail under stress.
Stitch density also affects appearance and hand-feel. Dense stitching creates seams that lie flat and smooth. On formal wear and atelier-grade pieces, seams feel almost imperceptible, that smoothness comes from proper stitch density combined with precise tension control.
Examining Seam Quality and Seam Allowance
Seams are where garments fail. A beautiful dress with weak seams will disappoint within weeks.
Inspecting seam allowance consistency
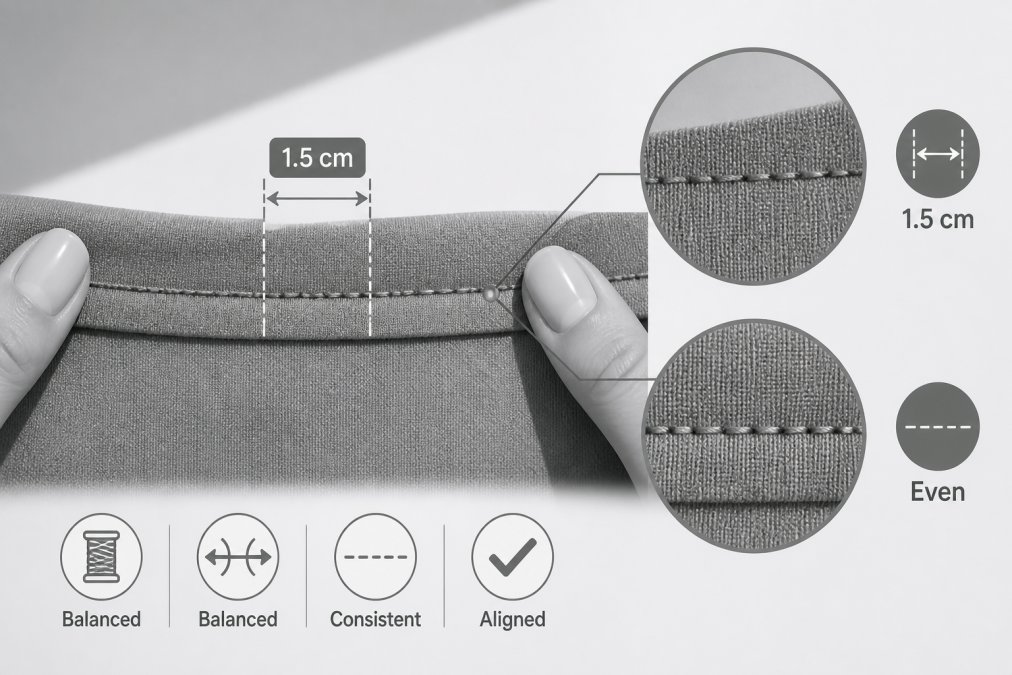
Seam allowance is the fabric between the stitching line and the edge of the fabric. Standard seam allowance is typically around 1.5 cm. Consistent seam allowance throughout the garment indicates precision in cutting and sewing.
To check seam allowance, look at the inside of the garment. The distance from the stitch line to the raw edge should be uniform. If the allowance varies, the garment was either cut carelessly or sewn without proper guides. Quality makers maintain tight tolerances on seam allowance, ensuring seams sit properly, hems hang evenly, and the garment maintains its intended shape.
Identifying skipped or loose stitches
Skipped stitches appear as gaps in the seam line where the thread failed to catch the fabric, creating weak points where the seam can split. Multiple instances across the garment indicate either machine problems or inadequate quality control.
Loose stitches are present but not tight enough to hold the fabric securely. You can sometimes see this as wavering or inconsistency in the stitch line. To check for these issues, examine seams from both inside and outside. Run your finger along the seam line. Quality stitching feels firm and smooth. If you feel little gaps or loose areas, the garment has construction problems that will worsen with washing and wearing.
How to Identify Durable Seams and Reinforcement
Durable seams are built, not accidental. The difference between a seam that lasts and one that fails comes down to technique, thread quality, and strategic reinforcement at stress points.
French seams versus serged seams
French seams are constructed by sewing two seams, one on the inside, one on the outside, which encase the raw edges completely. This labour-intensive method creates exceptionally strong, durable seams that look finished from both sides. French seams are common on quality garments, particularly in fine fabrics.
Serged seams use an overlock machine to trim and finish the raw edge in one operation. This faster method works well on knit fabrics and casual garments. A serged seam is durable and prevents fraying but typically indicates a garment made for moderate wear rather than heirloom quality.
To identify which method was used, look at the inside of the garment. French seams appear as a neat, enclosed line with no visible raw edges. Serged seams show the characteristic overlocked finish, a slightly raised, neatly trimmed edge.
Bar tacks and stress point reinforcement
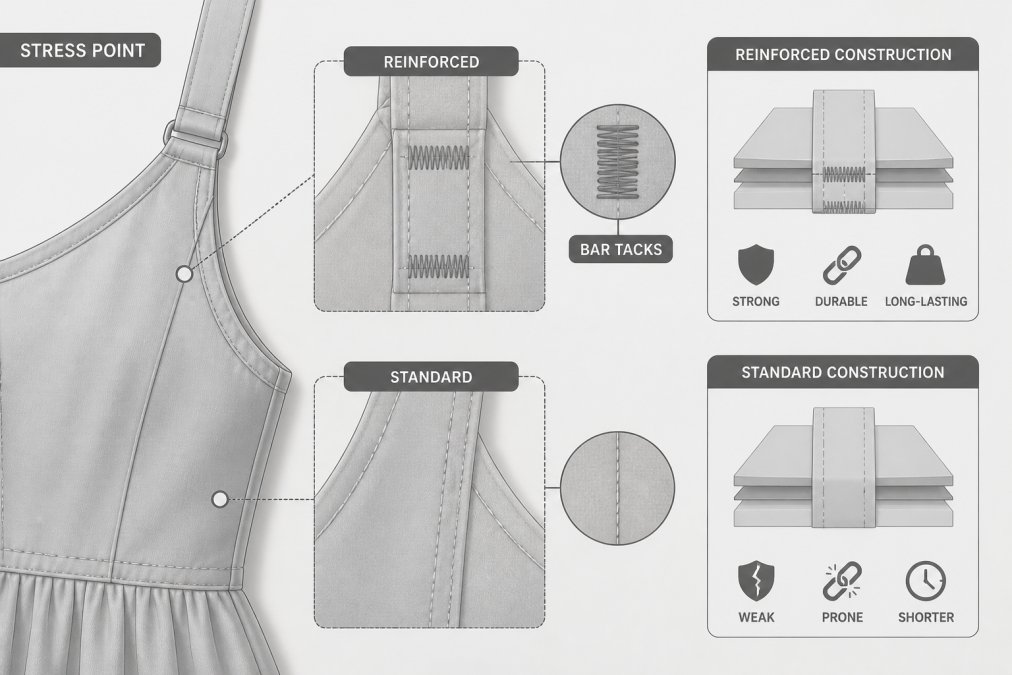
Bar tacks are small, dense blocks of stitching placed at stress points, typically where seams meet, such as at armholes, pocket corners, and zipper ends. These reinforcements distribute stress across a wider area and prevent seams from splitting at the exact point where they're most likely to fail.
Quality garments have bar tacks at every logical stress point. A dress with a zipper should have bar tacks at the top and bottom. Garments with pockets should have reinforcement at the pocket corners. To spot bar tacks, look at seam intersections and stress points. They appear as small, tight clusters of stitching, often at right angles to the main seam. Their presence is one of the clearest signals that a garment was designed with durability in mind.
Machine Versus Hand-Stitching: How to Tell the Difference
Most garments are machine-sewn, but some quality pieces incorporate hand-stitching for specific details. Machine stitching appears perfectly consistent, every stitch identical in size and spacing. Hand stitching has subtle irregularities, stitches vary slightly in size and spacing, and the thread tension may fluctuate.
To tell the difference, examine the seam closely under good light. Machine stitching will be absolutely uniform. Hand stitching will show human variation. Neither is inherently better; hand-stitching on a hem adds luxury, while machine-stitching on structural seams provides reliability. Many quality garments use both methods strategically: machine stitching for seams that need absolute strength, hand stitching for finishing touches that benefit from a softer appearance.
Checking Hems, Edge Finishing, and Fabric Hand-Feel
Hems and edge finishing separate quality garments from ordinary ones. A well-finished hem holds its shape through countless washes.
Hem finish techniques and what to look for
The most common hem finishes are machine-stitched hems, hand-stitched hems, and bound hems. Machine-stitched hems are strong and appropriate for most garments. Hand-stitched hems are more refined and typical of higher-end pieces. Bound hems prevent fraying and create a polished appearance.
To evaluate a hem, look at the inside first. The stitching should be straight and consistent. The hem allowance should be uniform throughout. Feel the hem from the outside, it should be smooth and invisible, not creating a visible ridge or bulge. Quality hems stay crisp and smooth; poor hems show wear quickly, the fold softens, and stitching becomes visible.
Assessing fabric quality and puckering signs
Premium fabrics accept stitching cleanly and hold their shape. Lower-quality fabrics can pucker even when stitching is perfect, because the fabric lacks the structure to resist thread tension.
Puckering appears as small gathered or wrinkled areas along seams. On quality garments, puckering should be absent or minimal. Run your hands across the fabric. Quality fabric has a smooth hand-feel, it's soft but has body and doesn't feel thin or flimsy. The fabric should drape well, holding folds without bunching, and return to its original shape without creasing permanently.
Post-Wash Stitching Integrity: Testing Durability
The ultimate test of quality garment stitching is how it holds up after washing and wearing. A seam that looks perfect in the shop might fail after a few washes if the construction wasn't sound.
After washing, examine the seams carefully. Stitching should remain tight and secure. Seams shouldn't have separated or loosened. Hems should maintain their crisp fold. Check stress points particularly carefully, if a seam was going to fail, it typically does so after the first few washes when the fabric has absorbed water and the thread has experienced repeated stress. A garment that survives the first three washes without seam separation has passed a meaningful durability test.
When shopping at any retailer, ask about care instructions and return policies. A maker confident in their stitching quality will stand behind the garment.
The difference between a garment that lasts and one that disappoints comes down to decisions made during construction. Quality stitching reflects intention, the choice to use proper thread, maintain consistent tension, reinforce stress points, and finish edges carefully. These details cost more in labour and materials, which is why quality pieces command higher prices.
When you examine a garment before purchasing, you're evaluating whether the maker invested in durability or cut corners for speed. Stitches per inch, seam allowance consistency, reinforcement at stress points, and edge finishing all tell the story of how much care went into that piece.
By learning to spot quality stitching yourself, you become a more discerning shopper capable of recognising true value in the pieces you invest in.
| Quality Indicator | What to Look For | Why It Matters |
|---|---|---|
| Stitches per inch (SPI) | 12-16 on standard seams, 18-20+ on stress points | More stitches distribute load evenly and prevent seam failure |
| Seam allowance | Consistent width throughout (typically around 1.5 cm) | Uniform allowance ensures even stress distribution and proper garment shape |
| Thread colour matching | Thread matches fabric colour perfectly in natural light | Indicates attention to detail and quality sourcing |
| Bar tacks | Present at all stress points (zipper ends, pocket corners, armholes) | Reinforces weak points and prevents splitting under stress |
| Hem finish | Straight, consistent stitching with invisible fold | Quality hems maintain shape through repeated washing |
| Puckering | Absent or minimal along all seams | Indicates proper thread tension and fabric-thread matching |
| Edge finishing | Serged, French seamed, or bound (no raw, fraying edges) | Prevents deterioration and extends garment lifespan |
Shopping for quality clothing means understanding construction as thoroughly as you understand style. The techniques described here, examining stitches per inch, checking seam allowance consistency, identifying reinforcement stitching, and assessing post-wash durability, transform you from a casual shopper into someone who can confidently evaluate whether a garment justifies its price.
Quality garment stitching is the foundation of every piece worth owning. Learn to look for these details, and you'll never settle for less than you deserve.
Frequently Asked Questions
How can you tell if clothing stitching is high-quality?
Quality garment stitching shows several telltale signs: even stitches per inch (typically 8-12 for most garments), consistent thread colour matching, no skipped or loose stitches, and straight seams without puckering. Run your finger along seams, they should feel smooth and secure. Check that thread tension is balanced on both sides and that reinforcement stitches appear at stress points like armholes and waistbands. High-quality pieces also feature finished edges rather than raw seams.
What is stitch density in clothing and how does it affect durability?
Stitch density refers to the number of stitches per inch (SPI) in a seam. Higher density generally means stronger, more durable seams because stitches are closer together and distribute stress more evenly across the fabric. For most garments, 8-12 stitches per inch is standard; luxury atelier-grade pieces often feature 10-14 SPI. Lower density (fewer stitches) creates gaps that can split under strain, especially after washing. Checking stitch density is one of the fastest ways to assess whether a garment is built to last.
What does quality stitching look like when inspecting a new garment?
Quality stitching appears perfectly straight and uniform, with stitches evenly spaced and matching in size. The thread should match the fabric colour precisely, and you'll see no loose loops, skipped stitches, or puckering. Seams should lie flat without bunching, and thread tension should be balanced, meaning the top and bottom threads are equally taut. Additionally, look for reinforcement at stress points (double stitching at seams, bar tacks at pocket corners, and backstitching at the start and end of seams).
How do I check if seams will hold after washing and wearing?
Inspect seams for adequate seam allowance (typically 5-15mm depending on garment type), which provides room for fabric movement without tearing. Look for finished edges, either serged, French seams, or bound edges, rather than raw edges that fray. Test seam integrity by gently pulling on a seam; it should not separate. For high-stress areas like underarms and crotch seams, check for double-stitching or reinforcement stitches. Garments with these features are far more likely to maintain seam integrity through multiple wash cycles.
This article was written using GrandRanker